As part of driving the adoption of AI assisted engineering, I’ve been thinking about more than just the tooling – I’ve been considering how we structure our solutions so they give AI the best possible chance of completing work successfully, while keeping token usage optimal by ensuring its context is as tight and focused as possible.
This won’t suit everyone’s use case, but there are a few patterns that emerge which allow you to move quickly if you can apply them, especially when you lean into a consistent structure across the stack.
I find the trick is mixing well-defined deterministic approaches with the capabilities of AI assisted engineering.
The Tech Stack
Consider a fairly standard setup: we need a front end, an API, and a data model. For this example, we’ll use:
- A React web front end using CoreUI
- A .NET Minimal API backend using Entity Framework and SQLite for local testing
- Playwright for UX testing
- OpenAPI for specifications
- Aspire for running local
You could swap in whatever backend technology you prefer. Historically, I might have split these into multiple repositories, but the first key takeaway is that when AI has access to the full stack it can carve out entire slices of functionality in one go, and managing context becomes significantly easier.
There are a few ways you could achieve this and still have things live in their own repositories, but from a speed perspective I’ve found that this approach works best with the least amount of overhead – you get a single deployment and build pipeline out of the process.
Rules for the Front End
Nothing unusual here: all business logic lives in the API and the React web application simply presents the data it’s given. If we wanted to add an app using React Native, this structure makes it much easier to start taking advantage of that without rethinking the backend.
One core rule is non-negotiable: the client must not hand‑write any API client code – it must be generated from an OpenAPI specification using a client generator. Don’t let the AI try to write any client code; instead, auto‑generate everything you can here.
In this setup:
- The API project uses a .NET tool to generate the OpenAPI spec.
- The front end uses Orval to generate the TypeScript client.
Because we’re working in a monorepo, this creates a clean and repeatable workflow:
- Make an endpoint change.
- Build the solution.
- Generate the OpenAPI specification as part of the build.
- Regenerate the TypeScript clients automatically.
This gives you deterministic output and AI only needs to modify the endpoints – everything else is handled through code generation.
Again, if you wanted to add a React Native app here, you could share the generated TypeScript client between applications.
Rules for the Backend
We follow a vertical slice architecture where every operation is exposed through a minimal API endpoint mapping.
Endpoints must be clean with no logic inside them. They define inputs and outputs and delegate everything to a CQRS pattern. For example:
internal static IEndpointRouteBuilder UseGetUserNotificationsEndpoint(this IEndpointRouteBuilder endpoints)
{
    endpoints
        .MapGet(
            "/communications/notifications",
            async (
                bool? includeRead,
                int? limit,
                IQueryService queryService,
                CancellationToken ct
            ) =>
            {
                GetUserNotificationsQuery query = new()
                {
                    IncludeRead = includeRead ?? false,
                    Limit = limit
                };

                NotificationListResponse? result = await queryService.Query(query);

                return Results.Ok(result);
            })
        .Produces<NotificationListResponse>()
        .WithName("GetUserNotifications")
        .RequireAuthorization()
        .AddOpenApiOperationTransformer((operation, context, ct) =>
        {
            operation.Summary = "Get notifications for the current user.";
            operation.Description =
                "Returns notifications for the authenticated user based on their RiskOwner profile. Filters by unread status by default.";
            return Task.CompletedTask;
        });

    return endpoints;
}
Establish this pattern early and encode it into your agent rules:
- No services, repositories, or data access inside endpoints.
- Everything is either a query or a command.
- Implementation lives inside the corresponding handler.
There are a few different ways you can use CQRS, but this creates a cookie‑cutter way of defining what an endpoint is and does, and your agent will happily create new endpoints that follow this approach.
The reason for this is single responsibility. I like that CQRS enforces this, but it’s also important to avoid sprawling “services” with lots of logic that might touch other parts of the system. This makes it much easier to work in slices, knowing that your changes can only impact the area you’re working in.
Handler Implementations
This is where the vertical slice comes together: each handler provides functionality for a single endpoint, and the implementation can be highly specific to the functionality being delivered.
The single responsibility principle is maintained, and the work to perform is easily isolated within the handlers. This has a few benefits when working on multiple things at once; you can kick off multiple agents working on different screens and parts of the system, and the chances of collisions is greatly reduced.
In most examples, I use an Entity Framework DbContext inside the handlers and perform straightforward CRUD operations, but you might have a variety of different implementations for the problem you’re trying to solve.
Data Setup
When using Entity Framework, I use SQLite locally and on the build server, and allow the schema to be recreated each time. I bake in seeding logic so the application self‑populates from a clean state on startup, which provides a consistent dataset for development and automated testing.
OpenAPI Generation
In the API project, add a tool and configure it as a build step so it works both locally and on build servers:
<Target Name="GenerateOpenApi" AfterTargets="Build">
  <Exec Command="dotnet swagger tofile --output $(ProjectDir)openapi.json $(TargetPath) v1"
        WorkingDirectory="$(ProjectDir)"
        EnvironmentVariables="SWAGGER_CLI=1" />
</Target>
Every build publishes an openapi.json document and you can then chain the client build from the .NET build:
<Target Name="BuildClientApp" AfterTargets="GenerateOpenApi" Condition="Exists('../clientapp')">
  <Exec WorkingDirectory="../clientapp" Command="npm run build" />
</Target>
In the client app:
"scripts": {
  "generate:api": "orval",
  "prebuild": "npm run generate:api",
  "build": "vite build"
}
Super simple – the flow becomes:
- Build .NET API
- Generate OpenAPI spec
- Triggers npm build
- Regenerates Orval client
If you like, Orval can also define a customFetch wrapper to handle cross‑cutting concerns such as access token management, logging and telemetry, and retry and failure handling.
You’ll find that this part remains relatively static while new endpoints are added or ameneded in the auto-generated code.
.NET Aspire
Since we have a react web app and an API, we can take advantage of .NET Aspire to handle the orchestration of these, get them both up and running and inject URLs, whilst giving us a full local open telemetry setup.
I find Aspire great for a local developer experience, it makes it really simple to run multiple applicatioons and gives us standardisation and tooling for sharing with other engineers.
Deploying
Again, from a speed perspective and to keep things as simple as possible with few moving parts, we can use Docker to build a single container that will host our web assets and API and serve everything for us.
Using multi‑stage Docker, we again build the API (generating the OpenAPI spec), run the npm build to generate Orval, then copy the final web assets into the wwwroot content directory of the API.
You can then deploy your container to the compute hosting of your choice and have your SPA and backing API served in one go, simplifying the overall deployment strategy and ensuring your contracts between client and API move as one.
Summary
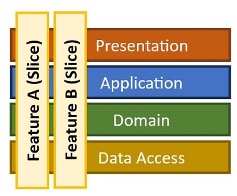
By following a vertical slice architecture in a monorepo, you create a system where everything needed to deliver a slice of functionality exists in one place and can be reasoned about together.
A typical prompt might look like this:
We’re generating a new screen to display audit events in the system. This should be a paginated grid view.
We need a new endpoint that returns a single page of audit data.

1.	Build a new endpoint that returns the audit response data.
2.	Add an Audit entity to the Entity Framework context and seed data following existing patterns.
3.	Implement a new CQRS query and handler to retrieve paginated data from the database.
4.	Create a new response object for the API.
5.	Follow existing OpenAPI patterns.
6.	Build the project to generate the OpenAPI spec and client.
7.	Create the new React view using the Orval-generated methods.
8.	Apply existing CoreUI styling patterns.
9.	Add navigation and breadcrumb plumbing.
10.	Add Playwright tests to verify navigation and seeded data rendering.
With a model like Opus, this can produce a fully working screen, client wrapper, API endpoint, and tests in minutes. It’s testable locally and on the build server, and ready to ship with a few minor tweaks. Opus will examine other endpoints and implementations to get a good understanding of what it needs to do, so establishing the patterns you want to follow early on will allow you to go faster.
The pattern keeps the context window tight and predictable – you’ve defined what a slice looks like, so adding new screens and functionality becomes a matter of carving out additional slices. Over time, prompts shrink even further as more conventions move into repository‑wide agent rules.
Since I’m using CoreUI, we have all the controls and examples defined as well, so the agentic approach can simply reuse established patterns across the entire stack. This helps keep your code clean and tidy while delivery cuts across boundaries in a well‑defined way.
Source Code
Full link to GitHub repo coming soooon